
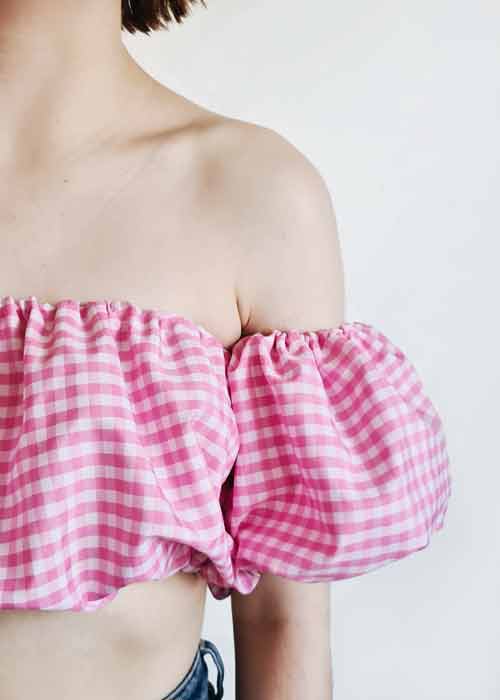
Who loves a Balloon Puff Sleeve? But do not like the balloon sleeve prices?
Then you will love this basic sewing tutorial that's budget-friendly and will show you how to create detachable puff sleeves you can mix and match with your wardrobe. All you need is basic sewing skills and an hour of your time.This is a great sewing project for beginners learning how to sew or more advanced sewers wanting to update their wardrobe with some current on-trend fashion pieces. This is the easiest way to make a puff sleeve without a curved shoulder design and still get the look.

LEARN HOW TO SEW A BALLOON PUFF SLEEVE TOP THE EASY WAY
EASY ON TREND FASHION DIY PROJECT
I was shocked while online shopping last week after seeing a boob tube with balloon sleeves for $150, like shocked! I knew this was the next sewing project that I could make for under $10 and a great on-trend style to add to your wardrobe.
- Basic sewing skills
- Approx cost under $10
- Approx time 1 hour
SUPPLIES OF WHAT YOU NEED TO MAKE A PUFF SLEEVE BOOB TUBE
- Basic Sewing machine with a straight stitch
- 2-3 metres of Elastic (any width under 1cm)
- Small Safety Pin
- Tape measure
- 1 x 1 metre of cotton or linen fabric.
- Sewing guide free printable

Step by Step Tutorial
STEP 1
Print out your free pattern guide to use while sewing, and measure your own size to the directions below.
STEP 1
Print out your free pattern guide to use while sewing, and measure your own size to the directions below.
STEP 2
Measure yourself.
Measure yourself.
You need 3 measurements for the puff boob tube
- Above the bust (1)
- Under the bust (2)
- The thickness you would like it to be to cover your bust. You can make this as short or long as you like. (5)
You need 2 measurements for the puffy balloon arms
- Top of your arm (3)
- Above your elbow (4)

STEP 3
Fold your fabric in half and measure your pattern pieces
Fold your fabric in half and measure your pattern pieces
Your pattern pieces will be 3 rectangles, 1 extra-long and 2 shorter for the arms. To get your measurements you need to add 1/3 to your measurements.
The boob tube is Above the bust + 1/3 of that measurement
The sleeve is Top of the arm + 1/3 of that measurement
Example of size 10 Australian measurements of a 20-inch bust (half for folded fabric, full bust 40)
1/3 of 20 is 6.66
The TOTAL width of the bust rectangle would be
20 + 7 inches = 27 inches
My final measurements in inches that I used on the folded fabric were
TUBE TOP 20 x 12 height
SLEEVE 12 x 12
If you want a more dramatic huge balloon sleeve, then add more fabric to your width.
STEP 4
Fold your fabric in half. Measure your panel pieces with a tape measure and cut
Fold your fabric in half. Measure your panel pieces with a tape measure and cut
You need at least a 3.5cm hem allowance at the top and bottom of each panel. When you cut, ensure you have allowed this in your panels, otherwise, your tube top may more skimpy than what you were wanting


STEP 5
Iron each long seam twice, fold over once leaving a 1.5 hem allowance and iron. Fold over again and iron for a second time, creating a double fold.
Iron each long seam twice, fold over once leaving a 1.5 hem allowance and iron. Fold over again and iron for a second time, creating a double fold.
Do this on the top and bottom of the tube top panel and the sleeve panels. This will stop any fraying of your fabric and create a beautiful neat tube for your elastic.


You do not have to do a double fold, you could sew a zigzag edge or use an overlocker before you fold over once. I am showing you a different way to create a professional finish for basic sewing machines and for people who would do not have an overlocker machine.
TIP - Recycle a cereal box or other cardboard box to make a hem ironing guide. Mark your cardboard with different widths for all your sewing projects.

STEP 6
Sew along each folded hem in a straight stitch at least 1cm from the edge. You need to leave enough space to allow your elastic to be threaded into the folded seam.
Sew along each folded hem in a straight stitch at least 1cm from the edge. You need to leave enough space to allow your elastic to be threaded into the folded seam.

STEP 7
Pin and sew your top and sleeve panels up creating a tube. Leave enough space at the top and bottom edge to feed your elastic through. Sew your inside seam flat.
Pin and sew your top and sleeve panels up creating a tube. Leave enough space at the top and bottom edge to feed your elastic through. Sew your inside seam flat.


STEP 8
Measure your elastic in 4 areas tight enough to keep the sleeves and top staying up. Place the elastic around the area and pull tight until it is a comfortable fit. Tight enough to stay up but not too tight it will cut off your circulation 😂
Measure your elastic in 4 areas tight enough to keep the sleeves and top staying up. Place the elastic around the area and pull tight until it is a comfortable fit. Tight enough to stay up but not too tight it will cut off your circulation 😂
Measure your
- Top of arm
- Above the elbow
- Above the chest under your armpits
- Under the chest
STEP 9
Place a safety pin through one end of your elastic and thread it through the tube hems, pushing the safety pin through to the other open end.
Place a safety pin through one end of your elastic and thread it through the tube hems, pushing the safety pin through to the other open end.


STEP 10
Tie a knot joining both ends of the elastic, close to the end. Pull the panels outwards to pop the elastic into the hole and evenly gather the fabric around the tube.
Tie a knot joining both ends of the elastic, close to the end. Pull the panels outwards to pop the elastic into the hole and evenly gather the fabric around the tube.
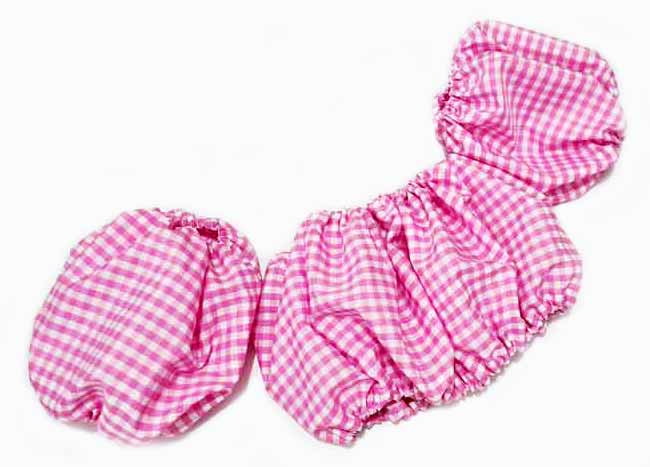
END RESULT
You now have a bubble tube with 2 detachable balloon puff sleeves. Puff out the sleeves when you wear it and make sure the fabric gathered is even all the way around the top and sleeve. Place the side seam at the back.


TIP - If you would like to attach the sleeves to the tube top, pin the pieces together under the arm and sew a 1-2cm line under the elastic
Update your wardrobe by using different prints, colours and fabrics to create fun fashion styles. Mix and Match your detachable sleeves with singlet tops, and dresses for evening, casual and fashion looks.
RELATED DIY FASHION BUDGET PROJECTS
- Sew your own Hair Scrunchies
- Sew a street-style Bumbag
- Sew a fashion Beret
- How to create 2 tone Jeans with Bleach
Hope you enjoy sewing this fashion trend tutorial, it really is a great fun style to wear with jeans and to give some edge to your look on a budget.
Where will you wear this look?
Pin for later
