

HUGE HAIR BOW TUTORIAL WITH FREE PATTERN
STAY SAFE FASHION ACCESSORY DIY Pt 2
HOW TO MAKE A HUGE HAIRBOW TO MATCH YOUR FACE MASK

This design is an easy sewing craft project for beginners and children. I have included a Free Printable Pattern below and full picture instructions for you to learn how to sew this classic Kawaii Pin-Up style Huge Hairbow.
A little fact about this design, a few years ago, okay about 14 years ago my sister and I had a successful Laser Jewellery & Accessory business and would sell online, tour with music festivals and sell at alternative markets. This Hairbow was a design we came up with late one crazy long night to use up fabric offcuts that were too small to use for most things.
There are only so many coin purses you can make without going insane lol And our motto is to never waste supplies and go to landfill. This design, along with another original hair tie, became one of our best sellers at music festivals and it would always be a joy seeing customers wearing them around.

This post is Part 2 of a series of Eco-friendly Fabric Face Mask designs that have matching accessories.
PART 1 FITTED FACE MASK TUTORIAL with Free Pattern
PART 3 RECTANGLE FACE MASK TUTORIAL with Free Printable Pattern
PART 4 HOW TO MAKE A HAND SANITISER HOLDER with Free Pattern
PART 5 HOW TO MAKE A MASK HOLDER Free Pattern
Instructions on your beginners guide to make a Large Fabric Hairbow to match your fabric Facemasks
DIY Supplies- Cotton or Natural Fibre Fabric
- Craft or Fabric Glue or a Hot glue gun
- Sewing Machine or you can Hand Sew
- Pins, Scissors & Cotton
- Rubber Band & Clamp/peg
- Iron
- Free Printable Hair Bow Pattern below (right-click & save) for personal use only

Step by Step Beginner Headband Hair Bow Picture Tutorial
- Print your Free Pattern on A4 paper and cut it out
- Place the pattern on your folded fabric and pin together
- Cut out the large rectangle, or if not folded, cut 2 x the pattern pieces and pin them together, ensuring the prints are facing each other
- Cut your small rectangle piece for later use
TIP - USE BOLD PRINTED FABRIC FOR STATEMENT PIECES OR NEUTRAL TONES OR COLOURS FOR A MORE ROMANTIC NATURAL BOHO STYLE.
Whatever pattern or colour you choose, the end result will be uniquely yours and match your own style, which is the joy of creating your own fashion pieces.

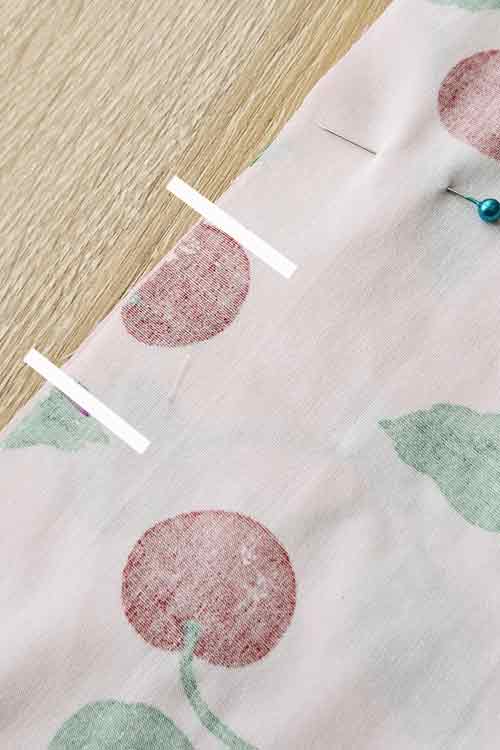
- Pin around the edge, leaving at least a 1-inch hole in the centre on the widest edge
- Sew a straight stitch along the edge, using your backstitch at the beginning and the end. Start where the hole will be and end once you reach the other side of the hole. You can hand-stitch this line with a needle and thread if you do not have a machine

- Cut the corners off, at an angle
- Where the hole is, turn the fabric the right way out by pulling from the inside. Push the corners out with a pencil, pen, chopstick, or whatever you have that will reach each corner
SEWING TIP - When sewing a straight line, use your guiding lines on your machine or place a rubber band around the base to keep the seam even and perfectly straight.


- Iron the mask flat ensuring the edges are out and ensuring the rectangle is even
- Fold each side of the small rectangle together (centre bow piece) and iron flat


- Fold your rectangle into a bow shape. Start by folding in half, back over and then back over again on both the top and bottom. The edge should look like a zigzag pattern


- Glue the middle strip you ironed around the bow, only glue the strip. Do not glue directly to the bow as you want to be able to move this centre strip for placement later
- Once dry, cut the end clean. This will face the back of the bow


- Once dry, place the bow on your headband where you would like the bow to sit, I like it to be towards one side on an angle but anywhere on the headband is fine. Place a rubber band around the middle to hold in place
- Glue down the edge of the bow to the headband, leaving an inch each. secure with clamps etc, I use clothes pegs


- Once dry, remove the rubber band
- Puff out the sides of the bow and squeeze the centre strip to sit up and high. You can mess around with making the bow high, puffy, full and grand

Combine with a matching face mask and you are ready to take on the world, fighting for one toilet paper roll at a time.


PART 1 FITTED FACE MASK TUTORIAL with Free Pattern
PART 3 RECTANGLE FACE MASK TUTORIAL with Free Printable Pattern
PART 4 HOW TO MAKE A HAND SANITISER HOLDER with Free Pattern
PART 5 HOW TO MAKE A MASK HOLDER Free Pattern


Where would you wear your Mask & Bow Combo?
Let me know below in the comments
KEEP SAFE!
Stay smiling & DIYing
Pin for later

