

HOW TO MAKE A FAKE NEON LIGHT SIGN PAINTING
EASY ART DRAWING PROJECT
I have wanted a neon sign to put in my home for so long and have made a few neon lights with small plastic tubing before for parties but they can be time-consuming. When I saw a new TikTok video of a Fake Neon Light Painting I knew I had to try it.
After watching a few DIY TikToks I knew I could achieve the same look with Posca Paint Markers instead of acrylic paints. I have never been great at painting straight neat lines with a paintbrush so acrylic paint markers it is. I feel this is my go-to painting hack, to be honest.
Can't paint? Use Paint Markers!
My sister is an expert at using paint markers, me not so much 😂 so after a visit to my sisters and lots of advice on how to use them for this Faux Neon Light style, I have made this short tutorial on how you can achieve this look to make your own custom faux neon light artwork. An example of my sister's work (LadyLowbrow) is below, she's a pretty talented artist.

FAKE NEON LIGHTS PAINTING DIY TIKTOK TREND
This is not a sponsored post but I do have ads displayed that may earn me a small commission,
these do not affect you in any way.
I have drawn a basic Skull and Bone Neon light design. Halloween is coming up, so it must be time to start getting our Halloween arts & crafts started.
DIY Supplies
- Black thick Cardstock. I used 300g cardstock
- Your Design
- Lead Pencil
- Pocsa Paint Pens or Paint Markers.
1 x White (round tip, medium size)
1 x Coloured pencil, the same colour as your main colour, only if you want a background glow


Step by Step Guide to Drawing a Fake Neon Light Sign Tutorial
INSTRUCTIONS- Sketch your Neon Light design. Draw a simple illustration with not too many lines close to each other
- OR if you see a design online that you would like to copy, convert it to a black and white outline in your art program and print it to fit your Cardstock size.
Draw around the outline of your design with a lead pencil. Flip the paper over and place where you would like the design on your black cardstock and colour in quickly over the whole paper to transfer the image onto your paper card. My transfer scribble looks quite scary, could be in a horror movie 😁 Draw lightly back over your transferred line on your black paper to make it easier to see and trace with your marker.


TIP - NEON LIGHTS DO NOT JOIN AT EACH POINT, SO MAKE SURE WHEN YOU ARE DRAWING YOUR DESIGN, YOU LEAVE A GAP BETWEEN EACH LINE.
Example below

- On a spare piece of paper or cardstock, practice your lines using the Paint markers. Ensure there is enough paint in your tip and that the nib moves smoothly over the paper. I practised getting used to the markers, drawing different shapes and layering the colours while watching tv before I drew my design. It's quite relaxing and I don't know why but very satisfying drawing on black paper.
Below are my practice sheets, you can see I have tested different size markers, but most practice designs didn't work. The flames were a disaster, they looked great before I tried another outside layer, which was too thick and all went to hell. Actually appropriate for the flames 😂
So I recommend if you have not used paint markers a lot, then do not skip this practice step. If I would have skipped this, I never would have succeeded with my final artwork and this neon tutorial would not be here. My second practice sheet of the kawaii ghost was a huge improvement from the first with getting a consistent paint flow and nice and bright.


I had a lot of trouble with a new medium-tip white marker. But nothing was going to stop me from creating this Fake Neon Light Painting so off I went back to the art shop the next day to get another marker and the shop assistant told me the one I had was faulty LOL Here I was thinking I was just terrible at applying white 😋
- Trace your outline with your main paint marker colour, making sure the line is thick enough and you have only drawn one consistent line. Do not go back over the top of the line yet. The paint will absorb into the black cardboard, this is how it will look below, which is what you want.


- Let the first layer dry 100% and repeat your lines 2 - 4 times, depending on how much the paint absorbs into your cardstock. The colour should be bright and solid, not see-through anywhere. Make sure each paint layer is completely dry before you move on to the next layer, otherwise, you will get a rough & raised paint look which is not the ultra-smooth look you are after and the paint may smudge. I had to apply the Pink Marker 4 times and the Blue 3.


- Once the bottom colour has dried completely, slowly draw in the centre of the main colour with your white paint marker. I also tested drawing slightly to one side of a design like a real neon light sign would look on a wall and this was also effective. So decide on your test drawing sheet if you want to draw the white highlight completely in the centre or off to one side.
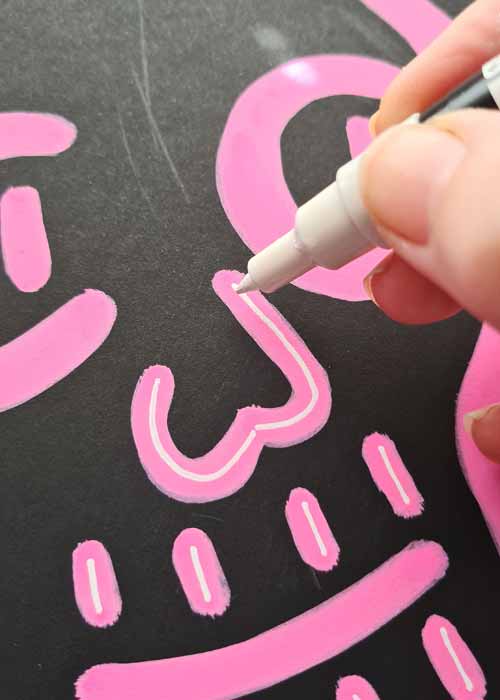
- Repeat the white marker 2 - 3 times to make it super bright. Again making sure each layer is dry before the next posca paint marker layer is added

If you have a multi-coloured art piece then repeat the above steps with your next colour.
- On the edge of your main colour, shade lightly with your coloured pencil to create an even more glow effect. You only need to do this step if you want to, your new Fake Neon Light Sign Painting will still look real hanging on your wall without the pencil shading and looks like it is glowing. I did not do this step as I loved this solid look, but you can see in my test sheet that used the pencil
You now have your own custom Fake Neon Light Sign to hang on your bedroom wall or feature in your home. This will brighten up any boring space and what makes it even better, is that you created it!

TIP - Posca paint markers are water-based so a few layers are needed for a bold colour on black paper. Make sure the paint is 100% dry before applying the next layer 😊
Always shake well & pump the tip on scrap paper until the paint has covered the whole nib end. Shake for a long time if the colour starts going opaque and pump the nib once again before using

I think this Neon Light Painting technique will be a unique way to make custom cards, artwork gifts for your friends and even put up behind your home bar. I can see the Neon Sign artwork now 'BOTTOMS UP' That's Australian slang for Start Drinking🍹

KEEP CREATING & SMILING 💗
Where will you display your Fake Neon Light Sign?
Let me know below in the comments
PIN FOR LATER

You may also like


